Injection Moulding Headaches Part 8: Voids (and How to Prevent Them) // Alliance Tooling Blog
|
Getting your Trinity Audio player ready...
|
Here’s another defect that’s often hidden until it’s too late. This week’s issue is voids.
This is the eighth instalment in Alliance Tooling’s weekly series, where the company explores common moulding defects and the practical steps that can prevent them through better design, tooling, and process control.
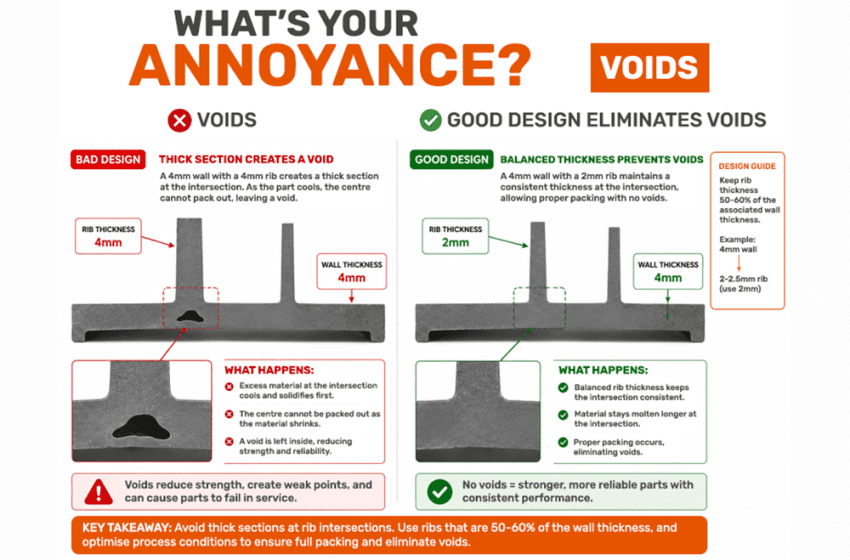
The Problem: Voids
Voids are internal air pockets or empty spaces trapped inside a moulded part.
Unlike sink marks, which are visible on the surface, voids often remain hidden beneath the outer layer of the component. This makes them particularly difficult to identify before they cause problems.
Voids can:
- Reduce part strength
- Cause unexpected failures in service
- Create dimensional instability
- Lead to rejected parts and warranty issues
- Be difficult to detect until a part breaks
Why do voids happen?
Voids typically occur when the outer surface of a part solidifies before the centre has fully packed out.
As the material cools and shrinks, there is insufficient material available to fill the internal space, leaving a cavity within the component.
Common causes include:
- Excessive wall thickness
- Poor part design
- Insufficient packing pressure
- Inadequate hold time
- Incorrect gate size or location
- Material shrinkage characteristics
How to design them out (before tooling even starts)
Good part design provides the strongest defence against void formation.
At Alliance Tooling, we focus on:
- Maintaining consistent wall thickness
- Coring out thick sections wherever possible
- Optimising gate location for effective packing
- Designing ribs and bosses correctly
- Ensuring balanced material flow throughout the part
By addressing these factors early in development, voids can often be prevented altogether.
Already seeing voids? Here’s how to fix them
If voids are appearing in production, several process improvements may help reduce or eliminate them:
- Increase packing pressure
- Increase hold time
- Optimise melt and mould temperatures
- Increase gate size where appropriate
- Improve material flow to thicker sections
- Review part geometry and wall thickness
In some cases, tooling modifications may be required to achieve consistent results.
Where we come in
Voids are rarely just a processing issue. More often, they indicate that the part design, tool design, or gating strategy is preventing the component from packing effectively.
At Alliance Tooling, we:
- Identify the root cause of void formation
- Optimise part and tool design for effective packing
- Help customers improve both strength and production consistency
 Whether the challenge involves a new mould tool, troubleshooting an existing moulding, or improving production reliability, we focus on eliminating hidden defects before they become costly failures.
Concerned about voids or unexplained part failures? Book a quick call with Chris Rossell, Technical Director, and we can review it with you.
Next week: Silver Streaks, why those shiny lines appear and how to eliminate them.
Read more news from Alliance Tooling here.

+44(0)116 275 0584
Website
Email