Injection Moulding Headaches Part 9: Silver Streaks (and How to Prevent Them) // Alliance Tooling Blog
 Dan Russell
- 3 minutes read

|
Getting your Trinity Audio player ready...
|
Here’s another defect that’s often hidden until it’s too late. This week’s issue is silver streaks.
This is the ninth instalment in Alliance Tooling’s weekly series, where the company explores common moulding defects and the practical steps that can prevent them through better design, tooling, and process control. This week’s issue is silver streaks.
The Problem: Silver Streaks
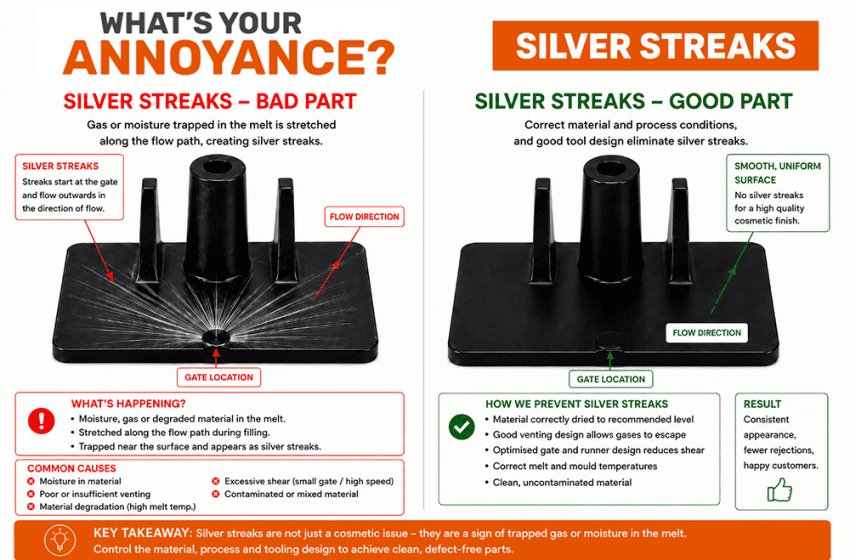
Those silvery, shiny lines that appear to radiate across the surface of a moulded part.
Sometimes they’re only visible under certain lighting. Other times, they’re impossible to miss.
Although they’re usually a cosmetic issue, silver streaks can also indicate that something isn’t quite right with your moulding process.
Silver streaks can:
- Ruin the appearance of high-quality parts
- Increase rejection rates
- Reduce customer confidence
- Indicate moisture, trapped gases or material degradation
- Be difficult to eliminate without understanding the root cause
Why do silver streaks happen?
Silver streaks occur when gas or moisture becomes trapped in the molten plastic and is stretched along the direction of flow during filling.
In many cases, the problem isn’t the tool at all.
Common causes include:
- Moisture in hygroscopic materials
- Material degradation from excessive melt temperature
- Trapped gas due to poor venting
- Contaminated or mixed material
- Excessive shear through small gates or restrictive runners
How to design them out (before tooling even starts)
While material preparation is critical, good tool design can significantly reduce the risk of silver streaks.
At Alliance Tooling, we focus on:
- Designing effective venting to allow gases to escape
- Optimising gate size to reduce excessive shear
- Designing smooth flow paths with minimal restriction
- Avoiding unnecessary sharp changes in section thickness
- Matching tooling design to the chosen polymer
Already seeing silver streaks? Here’s how to fix them
If silver streaks are appearing during production, several improvements can often solve the problem:
- Dry the material to the manufacturer’s recommended moisture level
- Reduce the melt temperature if degradation is suspected
- Improve venting within the mould
- Increase gate size where appropriate
- Reduce excessive injection speed if shear is causing the issue
- Check for contaminated or degraded material
In some cases, minor tooling modifications can dramatically improve venting and eliminate recurring defects.
Where we come in
Silver streaks aren’t always caused by the mould—but the mould often determines whether gases have a route to escape.
At Alliance Tooling, we:
- Assess both the tooling and the moulding process
- Design tools with effective venting from the outset
- Help customers eliminate cosmetic defects before they become production problems
Whether it’s:
- A new mould tool
- Troubleshooting an existing mould
- Or improving moulding quality
We work with you to find the root cause – not just treat the symptom.
 Whether the challenge involves a new mould tool, troubleshooting an existing moulding, or improving production reliability, we focus on eliminating hidden defects before they become costly failures.
Concerned about silver streaks or unexplained part failures? Book a quick call with Chris Rossell, Technical Director, and we can review it with you.
Read more news from Alliance Tooling here.

+44(0)116 275 0584
Website
Email